
STEP 1: Resting eye height slightly higher than the monitor height.
- This is considered to be the most neutral working position where the chin is neither raised or lowered.
- The top of the monitor’s screen is positioned slightly below eye level.
- The monitor should be positioned more or less about one arm’s length away from the person.
- Another pro-health tip: Tilt the bottom of the monitor upwards at approximately 15 degrees upwards, towards that person for a comfortable viewing position.
Neutral posture is a position that is considered to be optimal for that specific person.
Next up is working height. The easiest way to achieve neutral posture is to target the resting and neutral elbow height.
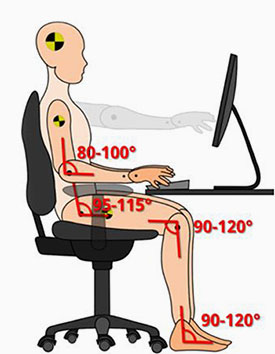
STEP 2: Resting elbow height slightly higher than the work surface height.
- Resting elbow height is where the shoulders are in a relaxed (not raised or lowered) posture and the elbows are bent at approximately 90 degrees.
- The chair’s armrests are positioned perfectly to support this neutral/resting position.
- When using the keyboard and/or mouse on top of the working surface (aka desk), its overall height should be slightly lower than that person’s neutral/resting elbow height.
- Discomfort symptoms may develop if the the working surface is positioned either too high or too low for that person.
Let’s move onto the proper lower back position...
STEP 3: Back comfortably supported by the chair’s backrest and slightly reclined.
- The lumbar support of the chair is one of the most important aspects of any chair due to its direct relationship with lower back comfort (and pain!).
- Ideally, the lumbar support’s outward curved (convex) shape comfortably supports the inner curved (concave) part of the user’s lower back (A.K.A. lumbar region) in both location and pressure (if that is a function of the chair).
- The backrest should be positioned between 95 and 115 degrees which is considered to be the optimal backrest angle.
- Pro-tip: It’s recommended that the person gets really familiar with the functions of their chair!
Next, let’s take a close up view of feet.
STEP 4: Feet flat on the floor.
- When the person’s feet are firmly on the floor that likely means that the chair height is neither too high or too low for them; it’s considered to be optimal.
- An optimal chair height position would also have the person’s thighs relatively parallel to the floor.
- If the person’s feet are not flat on the floor (or foot rest if they are using one) this could be because the chair is too high for them.
- Poor foot contact with the floor could predispose that person to circulatory concerns over time.
Lastly, the joints (including the elbows, shoulders and wrists) are explained!
STEP 5: Joints aligned.
- Positioning of the joints is an important aspect in workstation ergonomics.
- The joints (elbow, wrist, hip, knee, ankle, etc) should be within an optimal range, defined as somewhere in the mid-range of their maximum allowance of movement (see ranges in graphic).
- It’s key that joint angles should not be in extreme positions.
- There should also be no extreme movements in the upper extremities: the neck, shoulders, elbows, and wrists.
About the author
Darcie Jaremey is a Certified Professional Ergonomist through the Board of Certification in Professional Ergonomics, as recognized by the International Ergonomics Association. She also has a Masters of Science, specializing in ergonomics. To learn more, visit www.ergonomicsHelp.com.
Contents of this article remain the property of the author and/or publisher.